
A complete bathroom renovation transforms more than just tiles and fixtures. It rebuilds your space from the ground up, replacing outdated plumbing, repairing structural issues, and creating a functional room that serves your household for decades. Whether you’re updating a cramped 1980s ensuite or converting a tired family bathroom into a modern retreat, understanding each phase helps you prepare for the work ahead and avoid surprises along the way.
This guide walks you through every stage of a full bathroom renovation, from the initial strip-out to the final fit-off. You’ll learn what our team does at each step, why certain tasks matter for compliance and durability, and how to plan your project so it runs smoothly from start to finish.
Key Takeaways
- Strip-out removes all existing fixtures, tiles, and damaged materials to expose the structural frame and plumbing.
- Rough-in plumbing and electrical work must meet Australian Standards before waterproofing begins.
- Waterproofing protects wet areas from leaks and requires certification under NSW building codes.
- Tiling, fixture installation, and joinery follow a strict sequence to ensure proper drainage and alignment.
- Final fit-off includes painting, sealing, hardware installation, and a thorough quality inspection before handover.
Before any tiles go down or taps get installed, your bathroom needs a complete strip-out. This phase clears the room back to its structural bones, removing everything that won’t be part of your new design. It’s messy, loud, and essential for exposing hidden problems that could derail your renovation if left unchecked.
What Happens During the Strip-Out Phase
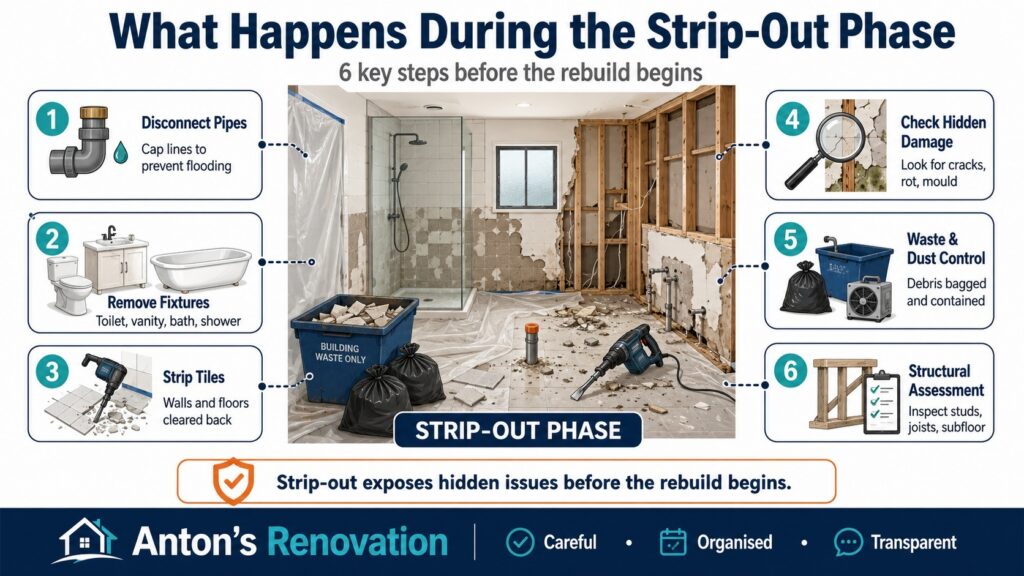
Strip-out starts with disconnecting water supply lines and capping pipes to prevent flooding. Our team removes toilets, vanities, shower screens, baths, and any built-in cabinetry first. These fixtures come out intact when possible, but older installations often break during removal due to decades of corrosion or over-tightened fittings. Once the room is clear of fittings, we strip tiles from walls and floors using hammer drills and chisels.
Old tiles rarely come off cleanly. Adhesive and render underneath can hide cracks in the substrate or water damage that wasn’t visible before. We inspect the framing, look for soft spots in the floor, and check for mould behind wall linings. If the subfloor feels spongy or studs show rot, we flag it immediately and discuss repair options with you before moving forward.
Demolition waste fills skips quickly. A standard bathroom generates one to two cubic metres of rubble, including broken tiles, old fixtures, timber offcuts, and plasterboard. We bag hazardous materials separately and arrange licensed disposal for asbestos if your home was built before 1990. Dust control matters during strip-out, so we seal doorways with plastic sheeting and run extraction fans to keep debris out of living areas.
Once the room is stripped to bare studs and joists, we assess the structure. Timber frames may need sistering if joists sag or show termite damage. Concrete slabs sometimes require patching where old pipe penetrations left voids. This stage sets the foundation for everything that follows, so we take time to get it right before ordering materials or scheduling trades.
Rough-In: Plumbing, Electrical, and Structural Work
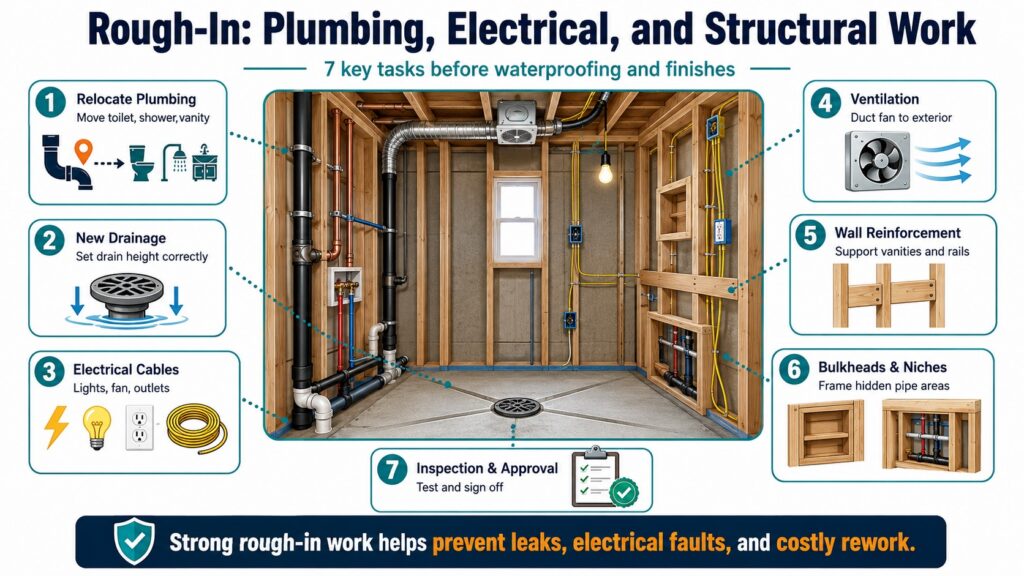
Rough-in work happens after strip-out and before any finishes go in. This phase involves installing new plumbing pipes, electrical cables, and structural supports that will sit behind your walls and under your floor. It’s the hidden infrastructure that makes your bathroom function safely and efficiently for years to come.
1. Relocating Plumbing Fixtures
If your new layout moves the toilet, shower, or vanity, we reroute waste pipes and water supply lines. Waste pipes must slope at least one percent to drain properly, which sometimes means lowering floor joists or building up the subfloor. We use PVC for waste lines and copper or PEX for hot and cold water, depending on your home’s existing system and local code requirements.
2. Installing New Drainage
Floor wastes and shower drains need precise positioning before tiling begins. We set the drain height to match your final floor level, accounting for tile thickness and screed depth. A poorly set drain creates pooling water or forces you to rip up tiles later, so we double-check measurements and test-fit grates before pouring screed or laying waterproof membranes.
3. Running Electrical Cables
Bathroom electrical work includes lighting circuits, exhaust fan wiring, heated towel rail connections, and power outlets outside splash zones. All cables run inside walls or ceiling cavities, protected by conduit where required. We install junction boxes for downlights and mark cable routes on studs so future trades don’t accidentally drill through live wires during fixture installation.
4. Upgrading Ventilation
NSW building codes require mechanical ventilation in bathrooms without openable windows. We install ducted exhaust fans that vent to the exterior, not into roof spaces where moisture causes mould and timber decay. Fan capacity must match room volume, so we calculate airflow requirements and select units that meet Australian Standards for noise and performance.
5. Reinforcing Walls for Fixtures
Wall-hung vanities, grab bars, and heavy mirrors need solid backing. We install timber blocking or steel reinforcement between studs at the correct height for your fixtures. This blocking sits flush with the stud face so plasterboard lays flat, but provides the strength needed to support weight without tearing through the wall lining.
6. Framing Bulkheads and Niches
If your design includes a recessed shampoo niche or bulkhead to hide pipes, we frame it during rough-in. Niches must be waterproofed later, so we build them with enough depth for tile and membrane without compromising wall structure. Bulkheads run along ceilings or walls to conceal plumbing risers and create clean lines in your finished space.
7. Inspection and Approval
Before covering any rough-in work, a licensed plumber pressure-tests water lines and a licensed electrician checks circuit integrity. We document this stage with photos and arrange council inspections if your project requires a Construction Certificate. No waterproofing or tiling starts until rough-in work passes inspection and gets signed off by the certifier.
Rough-in work typically takes three to five days for a standard bathroom, longer if we’re moving multiple fixtures or dealing with structural repairs. It’s not glamorous, but it’s the stage that separates a renovation that lasts from one that leaks or fails within a few years.
Waterproofing: Compliance and Certification
Waterproofing protects your home from water damage by sealing wet areas against leaks. In NSW, all bathrooms must be waterproofed to Australian Standard AS 3740, and the work must be carried out by a licensed waterproofer. This isn’t optional or negotiable—it’s a legal requirement that protects your investment and prevents costly repairs down the track.
We apply liquid membrane or sheet membrane to floors and walls in shower areas, around baths, and under floor wastes. The membrane extends at least 150 millimetres up walls from floor level and at least 100 millimetres beyond the shower recess on all sides. Corners, penetrations, and joins get extra reinforcement with fabric tape or preformed corners to prevent cracks from opening pathways for water.
Once the membrane cures, we flood-test the shower base by filling it with water and checking for leaks over 24 hours. If the water level drops or moisture appears on the ceiling below, we identify the fault, repair it, and retest until the area holds water without loss. Only after passing this test do we issue a waterproofing certificate, which you’ll need for final council approval and future property sales.
Waterproofing typically adds three to five days to your project timeline, including curing time before tiling can begin. Skipping this step or using unlicensed contractors voids your insurance and leaves you liable for any water damage that occurs. We document every waterproofing job with photos, test results, and compliance certificates so you have a complete record of the work.
Tiling and Substrate Preparation
Tiling transforms a waterproofed shell into a finished wet area. But tiles are only as good as the surface beneath them, so substrate preparation matters as much as the tiles themselves. We start by checking that all waterproof membranes are fully cured and that the substrate is clean, level, and free from dust or debris.
Floor tiles go down first, starting from the drain and working outward to ensure proper fall toward the waste. We use flexible tile adhesive rated for wet areas and apply it with a notched trowel to create even coverage. Spacers keep grout lines consistent, and we check levels constantly to avoid lippage where one tile sits higher than its neighbor.
Wall tiles follow once the floor is set. We begin at the bottom and work up, cutting tiles around taps, shower roses, and niches with a wet saw for clean edges. Feature tiles or accent strips get positioned according to your design plan, and we dry-lay sections beforehand to confirm the pattern works before committing adhesive. Large-format tiles require extra care to prevent hollow spots that can crack under pressure.
Grouting happens after tiles cure for at least 24 hours. We use epoxy grout in showers for superior water resistance and stain protection, and cementitious grout elsewhere depending on your preference. Grout lines get tooled to a slight concave profile, which sheds water better than flush or convex joints. Excess grout comes off with a damp sponge before it hardens, and we polish tiles with a clean cloth once the grout hazes over.
Tiling a standard bathroom takes four to six days, including curing time between stages. Rushing this phase leads to cracked tiles, uneven surfaces, and grout that stains or crumbles within months. We take the time to do it right so your tiles look sharp and perform well for decades.
Fixture Installation and Joinery Fit-Off
With tiles in place, your bathroom starts to look like a finished room. Fixture installation brings functionality to the space, connecting all the rough-in plumbing and electrical work to the fittings you’ll use every day. This stage requires precision because misaligned fixtures create leaks, poor drainage, or fittings that look crooked even when they’re level.
We install the toilet first, setting it on a new wax ring or rubber seal and bolting it to the floor flange. The cistern mounts to the wall or sits on the pan, depending on your model, and we connect the water supply line with a flexible hose that allows for minor movement without leaking. A quick test flush confirms the waste line drains properly and the fill valve shuts off at the correct level.
Vanities come next. Wall-hung units bolt to the timber blocking we installed during rough-in, and we check level in both directions before tightening fixings. Freestanding vanities sit on adjustable feet that let us fine-tune height and compensate for uneven floors. We connect the basin waste and taps, seal the basin to the benchtop with silicone, and test for leaks by running water for several minutes while checking joints underneath.
Shower screens and bath panels follow vanity installation. Frameless screens require precise measurement because there’s no frame to hide gaps or misalignment. We drill fixing holes through tiles carefully to avoid cracking, seal penetrations with silicone, and adjust hinges so doors swing smoothly without binding. Semi-frameless and framed screens offer more adjustment tolerance but still need careful positioning to prevent leaks along seals.
Tapware and accessories get installed last. We fit shower roses, mixers, spouts, towel rails, toilet roll holders, and robe hooks according to your fixture schedule. Chrome and brushed nickel finishes need protective film left on until final cleaning to prevent scratches during the fit-off phase. We test every tap for smooth operation and check that diverters switch between shower and spout without sticking or leaking.
Mirrors, shaving cabinets, and medicine cabinets mount to walls using the backing we installed earlier. We position mirrors at a height that works for your household and ensure cabinets open without hitting light fixtures or door frames. Electrical items like heated towel rails and exhaust fans get final connections, and we test switches to confirm everything operates as intended.
Fixture installation and joinery fit-off take two to three days for a standard bathroom. This phase brings together all the planning and rough-in work from earlier stages, so attention to detail here makes the difference between a bathroom that functions smoothly and one that frustrates you every time you use it.
Painting, Sealing, and Final Touches
Painting and sealing protect surfaces and give your bathroom a polished, finished appearance. We start by masking tiles, fixtures, and joinery with tape and plastic sheeting to prevent overspray or roller marks. Ceilings get painted first using low-sheen or semi-gloss acrylic paint rated for high-moisture areas, followed by walls if you’ve chosen paint over tiles in non-wet zones.
Silicone sealing comes after painting. We apply neutral-cure silicone along all tile junctions, around the bath, shower base, vanity benchtop, and where walls meet the floor. The silicone bead needs to be smooth and consistent, tooled with a wet finger or shaping tool to create a neat concave profile that sheds water and resists mould growth. Cheap silicone fails within months, so we use premium brands rated for wet areas and UV resistance.
| Renovation Phase | Typical Duration | Key Activities |
|---|---|---|
| Strip-Out | 1–2 days | Remove fixtures, tiles, and damaged materials; assess structure |
| Rough-In | 3–5 days | Install plumbing, electrical, ventilation, and structural supports |
| Waterproofing | 3–5 days | Apply membrane, flood-test, issue compliance certificate |
| Tiling | 4–6 days | Prepare substrate, lay floor and wall tiles, grout and clean |
| Fixture Fit-Off | 2–3 days | Install toilet, vanity, shower screen, tapware, and accessories |
| Final Touches | 1–2 days | Paint, seal, clean, and inspect before handover |
Final touches include fitting door hardware, adjusting cabinet hinges, tightening tap handles, and replacing any protective film on fixtures. We install exhaust fan covers, light diffusers, and any decorative elements like shelving or hooks. Every drawer and door gets checked for smooth operation, and we adjust soft-close mechanisms so they engage properly without slamming or sticking.
A thorough clean follows all installation work. We scrub tiles to remove grout haze, polish tapware, vacuum dust from corners, and wipe down all surfaces. The goal is to hand over a bathroom that’s ready to use immediately, not one that needs another hour of cleaning before you can step into the shower.
Painting, sealing, and final touches take one to two days. This stage might seem minor compared to plumbing or tiling, but it’s where craftsmanship shows. Neat silicone lines, crisp paint edges, and fixtures that operate smoothly all contribute to a bathroom that feels professionally finished rather than hastily assembled.
Quality Inspection and Handover
Before we hand over your completed bathroom, we run a final quality inspection. This involves checking every fixture for leaks, testing all electrical items, confirming that doors and drawers operate smoothly, and ensuring that tiles, grout, and silicone meet our workmanship standards. We also verify that ventilation works correctly and that all compliance documentation is complete.
You’ll receive a handover pack that includes waterproofing certificates, electrical compliance certificates, product warranties, care instructions for tiles and fixtures, and contact details for any follow-up support. We walk you through the space, explain how to operate fixtures, and answer any questions about maintenance or cleaning. If we spot any minor issues during the final inspection, we fix them before you take possession.
Our work is backed by a service guarantee that covers defects in workmanship. If a tap leaks, a tile cracks due to poor installation, or silicone fails within the warranty period, we return to fix it at no charge. This guarantee doesn’t cover damage from misuse or lack of maintenance, but it gives you confidence that we stand behind the quality of our work.
Handover marks the end of construction and the start of enjoying your new bathroom. We respect that renovations disrupt your home, so we aim for a fast turnaround without cutting corners. From initial strip-out to final handover, a complete bathroom renovation typically takes three to four weeks, depending on the complexity of your project and the availability of custom fixtures or materials.
Why Choose Our Complete Bathroom Renovation Service
We bring over 15 years of renovation experience to every bathroom project across Sydney. Our team handles the entire process from design consultation through to final handover, so you work with one trusted contractor instead of coordinating multiple trades. We manage scheduling, order materials, arrange inspections, and keep you informed at every stage so your project runs smoothly from start to finish.
Every bathroom renovation we deliver complies with NSW Fair Trading licensing requirements and relevant Australian building standards. We use licensed plumbers, electricians, waterproofers, and tilers who know the codes and follow them without shortcuts. You’ll receive all required compliance certificates and documentation, giving you peace of mind and protecting your property value for future sales or refinancing.
We tailor every project to your home, budget, and lifestyle. Whether you’re updating a compact apartment bathroom, renovating a family home with multiple bathrooms, or creating an accessible wet room for aging in place, we listen to your needs and design a solution that works. We don’t offer cookie-cutter packages or pressure you into unnecessary upgrades—just honest advice and quality workmanship that lasts.
Our service area covers the Inner West, Eastern Suburbs, North Shore, Northern Beaches, Hills District, Western Sydney, Sutherland Shire, and surrounding Sydney Metro regions. We understand local building conditions, council requirements, and the unique challenges of renovating heritage homes, modern apartments, and everything in between. If you’re ready to start your complete bathroom renovation, call 0466 334 065 or request a free onsite quote to discuss your project with our team.
Conclusion
A complete bathroom renovation involves careful planning, skilled trades, and attention to detail at every stage. From strip-out through to final fit-off, each phase builds on the last to create a functional, durable space that serves your household for decades. When you understand what happens during the process, you can prepare your home, set realistic expectations, and work confidently with your renovation team to bring your vision to life.
Antons Renovation brings over 15 years of bathroom renovation expertise to every Sydney project. We handle strip-out through final fit-off with precision and transparency. Get started on your transformation today.
Related Articles
- Bathroom Renovation Contractor: Questions to Ask Before Work Starts
- Budget Bathroom Renovation: Smart Ways to Save Without Cutting Corners
- Bathroom Renovation Design: Practical Ideas That Work in Australian Homes
FAQs
What happens first during a complete bathroom renovation?
A complete bathroom renovation usually begins with site preparation and strip-out, where existing fixtures, fittings, tiles and other finishes included in the agreed scope are removed. The renovator can then inspect exposed areas and prepare the room for plumbing, electrical, waterproofing and other required work.
What is involved in the bathroom strip-out stage?
The strip-out stage involves removing the bathroom components specified for replacement, which may include the vanity, toilet, bath, shower screen, tiles, wall linings or flooring. Careful demolition is important because plumbing, electrical services and structural elements may be concealed behind existing finishes.
Can problems be discovered after an old bathroom is stripped out?
Yes. Removing tiles and fixtures can expose issues that were not visible beforehand, such as deteriorated substrates, moisture damage, ageing plumbing or other defects. Any newly discovered work should be assessed before the renovation proceeds so the scope can be adjusted appropriately.
When is plumbing completed during a bathroom renovation?
Plumbing rough-in generally occurs after demolition and before walls, waterproofing and finishes are completed, allowing water and drainage services to be positioned for the planned fixtures. Homeowners in Kings Park undertaking this type of project can explore our bathroom renovation services in Kings Park to plan plumbing and other renovation stages as part of the overall project.
What does bathroom plumbing rough-in mean?
Plumbing rough-in refers to installing or adjusting concealed water supply and drainage services before the finished fixtures are connected. The work is based on the approved bathroom layout and needs to be coordinated with cabinetry, showers, baths, toilets and other fixtures.
When is electrical work carried out during a bathroom renovation?
Electrical rough-in is generally completed while walls and ceilings are accessible, before final linings and finishes are installed. Final electrical fit-off takes place later when items such as lights, switches, exhaust fans and other electrical fixtures are ready to be connected by an appropriately licensed electrician.
Can I move the toilet, shower or vanity during a complete renovation?
Yes, subject to the existing structure, plumbing and drainage configuration and the feasibility of the proposed layout. Moving fixtures can require additional plumbing and building work, so these changes should be planned before rough-in begins.
When is bathroom waterproofing installed?
Waterproofing is completed after the relevant substrates and junctions have been properly prepared and before tiling in areas that require waterproofing. The system must be installed in accordance with the applicable requirements and the manufacturer’s specifications before subsequent finishes are applied.
Why is waterproofing important in a complete bathroom renovation?
Waterproofing helps prevent water from reaching building materials in areas exposed to regular moisture, particularly around showers and other wet zones. Correct detailing around junctions, penetrations and changes in plane is important because these areas form part of the bathroom’s overall water-management system.
What happens after the waterproofing stage?
Once the waterproofing system has been installed and is ready for the next stage in accordance with its product requirements, tiling and related finishes can proceed. Homeowners in North Willoughby planning a complete upgrade can explore our bathroom renovation services in North Willoughby to coordinate waterproofing, tiling and later fit-off within the broader renovation.
How are bathroom floors prepared for tiling?
Floor preparation depends on the existing substrate and the planned bathroom design and may involve repairs, levelling or forming appropriate falls where required. The surface needs to be suitable for the specified waterproofing and tile installation system before finishes are applied.
How long does bathroom tiling take?
The timeframe varies according to the size of the bathroom, tile dimensions, layout, pattern, substrate condition and amount of cutting required. Adhesives, grout and other materials also have manufacturer-specified curing or drying periods that can affect when subsequent work can begin.
What is bathroom fit-off?
Fit-off is the later stage when finished fixtures and fittings are installed or connected after major construction and finishing work has been completed. Depending on the project, this can include the toilet, vanity, basin, tapware, shower fittings, shower screen, lighting and accessories.
When is the vanity installed during a bathroom renovation?
Vanity installation usually occurs during the finishing and fit-off stages once the surrounding surfaces are sufficiently complete and the installation area is ready. Plumbing connections are then completed in coordination with the vanity, basin and selected tapware.
When is the shower screen installed?
The shower screen is generally installed toward the end of the renovation after tiling and relevant finishes are complete and measurements can be confirmed. Installation timing can vary depending on whether the screen is standard-sized or custom-made.
Can I choose fixtures and finishes before the renovation begins?
Yes, and selecting key items early can help with accurate planning because fixture dimensions, plumbing locations and installation requirements can affect the layout and rough-in. Homeowners in North Wahroonga preparing for a complete renovation can explore our bathroom renovation services in North Wahroonga to discuss selections alongside the overall bathroom design and construction scope.
How long does a complete bathroom renovation usually take?
There is no single timeframe because the duration depends on the bathroom size, scope of demolition, plumbing and electrical changes, waterproofing, tiling complexity, product availability and any unexpected conditions discovered during construction. A project-specific schedule should be prepared once the renovation scope and selections are confirmed.
Can I use the bathroom while it is being completely renovated?
A bathroom undergoing full strip-out and reconstruction will generally be unavailable for much of the project because plumbing fixtures, waterproofing and finished surfaces may be removed or incomplete. Households with only one bathroom should discuss temporary arrangements and expected periods of disruption with the renovator before work begins.
What should happen before the renovated bathroom is handed over?
Before handover, the completed work should be reviewed against the agreed scope and any outstanding finishing items identified. Fixtures, fittings and visible finishes can also be checked so any required adjustments or completion items are addressed before the project is considered finished.
What should I check when choosing a company for a complete bathroom renovation?
Review the company’s experience, proposed scope, inclusions and exclusions, allowances, project process and how plumbing, electrical, waterproofing and other required trades will be managed. A clear written quotation and defined scope make it easier to understand what is included from strip-out through to final fit-off.
